

One of the most popular and powerful features of Cricut Design Space is the ability to upload your own images to use in projects. Whether you make your own images, purchase images, or use your own photographs, importing images lets you add a very personal touch to whatever you’re crafting.
Cricut Design Space understands image files that end in .jpg, .bmp, .png, .gif, .svg, and .dxf. This video has information about file types as they relate to Design Space. In this post, I’m going to focus on the best practices for how to upload a SVG file.
What is a SVG file?
A SVG file is a ‘scalable vector graphic.” A vector is just a line, like you learned about in high school geometry. An SVG image is basically a “drawing” of a picture – just the outline – and a little more data to tell what’s inside any enclosed spaces (the filled-in parts). SVG files also support stacking up images in what are called “layers.” It’s very much like what Cricut Design Space does when you design your own projects with multiple images.
Since the image is constructed in vectors rather than pixels, it can be resized without losing quality. In Design Space, each layer of the SVG file can be cut or the layers can be flattened for print then cut. SVG files are the best choice for using in Design Space.

The image I’ll be using for this demo is a free download from CraftHouse SVG.
Getting started


After downloading and unzipping the file (if needed), I recommend saving the images to a folder on your computer.
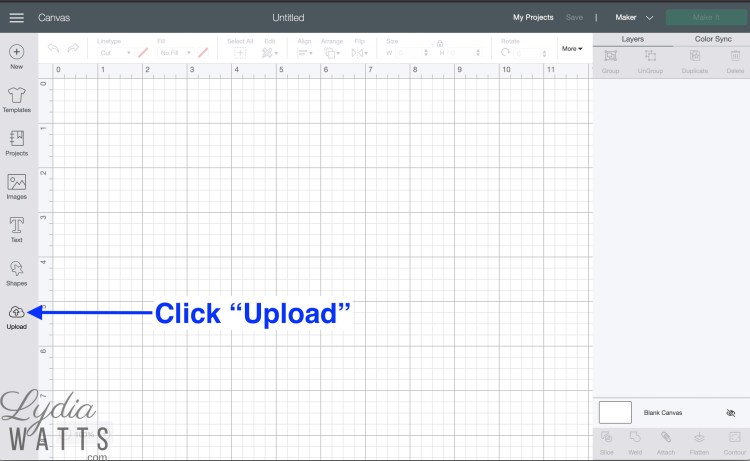

Next, click Upload in Design Space. Then click Upload Image.


Now click Browse and navigate to the folder on the computer to be uploaded. Open the folder.

At this point, either choose the image and click Open or just double click the image thumbnail. Note that if you are using Windows 10, the SVG file may show a “.html” extension. Select that file. Here’s more information about file extensions and associations in Windows 10.
Saving the Image in Cricut Design Space

Note that the image comes into Design Space as a cut image, and there is no other option.
Wait! Why is there no other option? Design Space “sees” an SVG image as a series of lines that it needs to cut, not as the “finished” picture. The image can be flattened in Design Space if you want to make it print then cut.

In this screen, you can name the image and add tags. (I usually add letters at the beginning of the image name to remind me where I got it – “CH” for “Craft House” in this case.)
Tags help the image show up in image searches. I usually add tags for the subject of the image and where I got it. Tags can’t be added later, so it’s important that this is done before uploading.


Now, the image appears in Recent Uploads. You can also find it in search results by filtering to Uploaded Images. Select the image and click the green Insert Images button at the bottom to add the image to the design canvas.
I demonstrate this process in this brief video:

2 thoughts on “Cricut Design Space Basics: Uploading SVG Files”