

A common issue that many new Design Space users encounter concerns connecting cursive text. When generating text in Design Space, the letters will be separate. There are a few different ways to connect cursive text in Design Space. Here’s the method I like to use:
Ungroup

After inserting the text, click “Ungroup.”
Move Letters

Each letter is now separate. While holding down the shift key, move the letters together until they touch. Holding down shift key while moving the letters with the mouse will keep them on the same x-axis.
Select the Text

To select the text to be welded, you can:
- drag a bounding box around your text, or
- hold down the shift key while selecting the letters in the Layers panel or on the design screen

When the cursive text to be welded is selected, click WELD.

If letters like “e” or “o” fill in, they are too close together. To fix this, undo the weld, move the letters slightly apart, and then weld again.

Remember that weld only needs to be used when connecting cursive text or combining images. Attaching will hold cut placement.
FontLab Pad
Another option with system fonts is using an outside program like FontLab Pad. This program does one thing, but it does that one thing really well. After downloading and opening FontLab Pad, go to File>Open Installed.

A window will open with all the fonts installed on the computer. You can scroll to find a font you like or use the search box to find a font by name. I selected Blue Planet.

After clicking “OK,” a window will open where I can type my text.


Next, I click on the down arrow in the upper right corner, and select “Save As.” I save it as a .svg file in the folder where I save my other downloaded .svg files.

Upload the .svg file to Design Space just like any other image, select it, and put it on the design screen. A big advantage of creating text outside of Design Space is that it is now an image which is available to put in other projects.
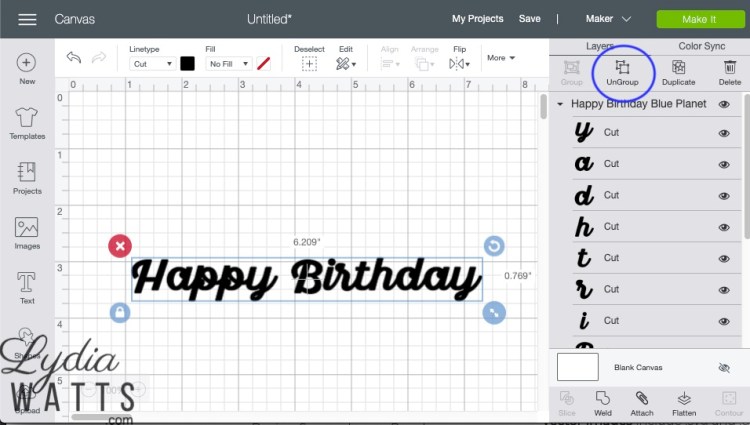

I could weld the letters right away, but that the “H” and the “B” are still separate. If I weld and cut the words as they are, I will get five separate cuts (including the dot on the “i”). I decided I wanted to connect those letters to the words, so I ungrouped and moved the capital letters so that they touched the rest of the words. After cutting I will have three pieces – the two words and the dot on the “i”.


I welded the words separately so that I can move the words around independently.

Here are links to the fonts I used:
https://fontbundles.net/free-fonts/blue-planet
https://thehungryjpeg.com/freebie/61113-free-font-milkshake
I demonstrate these techniques in this video:
Thank you so much that was extremely helpful I really appreciate all the help you gave thank you
Very useful & helpful. Thanks! Would it be possible to have these guides in a printable .pdf format so they are easily accessible, rather than flipping between screens?