

Print then Cut is a great feature that I use for lots of projects. What usually trips people up is getting the print then cut image to cut around the print then cut image and leave the inside of the image intact. This is usually caused by one of two things, and both of them have to do with flattening.
Image is not flattened


Changing all the images to print without flattening will cause all the printed images to cut individually. Design Space will see each image as a separate layer and will cut each color separately. Multi-layer images are designed to be cut as several cuts of different color materials that you then assemble into a single design. Flattening compresses the layers of a multi-layer image into a single-layer printable image.
Flattening will also change the image from cut to print, and so there’s no need to change the layers to print before flattening. Also, images don’t need to be attached, grouped, or welded before flattening.
Image isn’t flattened to a solid shape

Images need to have a solid background before flattening. Otherwise the inside and outside of the image will cut rather than just the outer edge. If you see gridlines, you are seeing cut lines.
If your design is a simple shape like a circle or a square, you can insert a white shape from the shapes panel, make it a little smaller than the border image, put it behind the original image, select all, and flatten.

If the shape is irregular, you will need to duplicate the shape and create a background by following these steps:

1. Select the border (shape without background) and duplicate.

2. Select the duplicate and click “Contour.”

3. Click the inside of the shape to hide the inner cut line. Click the “X” in the upper right corner to exit this box.

4. Change the color of the solid shape to white if it is a different color.

5. Move the solid shape on top of the text and original shape. (Don’t worry about fitting it perfectly over the shape.)

6. With the solid shape selected, click “Arrange,” then “Send to Back.”
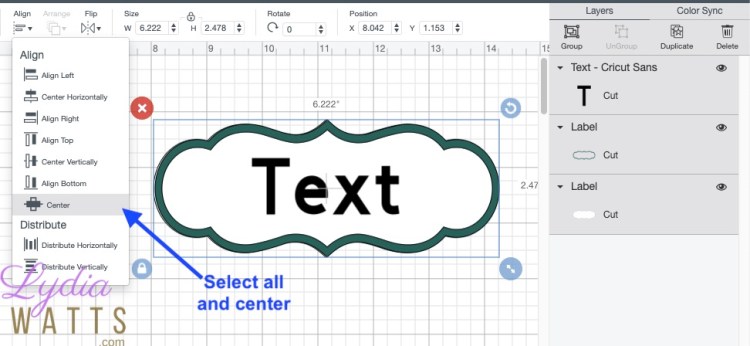
7. Click “Select All” (or drag a bounding box around the entire design), then click “Align” and “Center.”

8. With all the layers still selected, click “Flatten” in the lower right corner.
Now, click “Make It” and follow the prompts to print on your home printer and cut on your Cricut Explore or Maker.
Here’s a brief video demonstrating this process:
Is there a way to cut around a design without using print and cut? If I wanted a design in vinyl but didn’t want it to cut the inside of the design but rather have cut around it and leave the inside design intact.
The only other option would be to use SnapMat in the Design Space iOS app. https://help.cricut.com/hc/en-us/articles/360009379934-SnapMat-FAQ
Hi Lydia,
Last night my cricut worked just fine. Now today I am trying to do the same cuts and my cricut is cutting out both inside and outside of the of the cutline. It is the same file that worked last night. It is a PNG from Ai. I called support but they kept switching me between departments because one would say that’s a machine issue, the other would say it was design space issue. When I upload and try from scratch the same thing happens. Everything looks correct, gray circles with a thin black cut line around each, but then upon cutting it tries to cut out both the circle and the outline cutline and now my circles are slightly too small and too boot the edges are severely frayed from the super thin double cuts. IF you can help, many thanks! If you can’t many thanks anyway!
I haven’t heard of others having this issue. Without seeing the design screen, my best suggestion would be to go into the Design Space settings and switching to the “classic” canvas if you have not already done so.
I am also having this issue worked fine yesterday and today is cutting way to far. i have callibrated and everything still not working. it is cutting no where near what the image should be cut.
If you have flattened to a solid shape and calibrated for print then cut and are still having trouble, you will need to call Cricut on Monday so they can run diagnostics on your machine. https://help.cricut.com/hc/en-us/articles/360020316674-Cricut-Contact-Information
Could you tell me how I would print on transparent sticker paper and make a clear border around the design. I have created 2 files one with a design and one with a cut line and added them both to the design space. I chose print and cut for the design and cut only on the other, but I’m not sure if that’s correct as it looks like it will cut around the design as well.
Any help would be much appreciated! 🙂
You don’t have to set anything to print then cut. All you need to do is select all the layers including the background layer and flatten. Here is my post on making print then cut stickers: https://lydiawatts.com/2020/09/20/how-to-make-print-then-cut-stickers-in-cricut-design-space/.
Thank you for a great tutorial! I’m trying to troubleshoot my sticker design and am unsure why the contour button is grayed out. I’ve tried bringing in my files as JPG, SVG, and PNG, but my machine wants to cut each individual color layer inside the image separately. I’ve tried welding, flattening, and attaching with no luck.
It’s hard to say without seeing your layers panel, but if it’s cutting each layer, then you haven’t flattened correctly. You have to select ALL the layers, and then flatten together. Flattening each layer won’t work.
I really hope you can help me with this. I am uploading decoupage sheets from CraftsUPrint, currently roses, but when I load into Print and Cut, it wants to cut out highlights within the design, like reflections on petals. How do I make it just cut the outline.
You don’t have a solid background. You need to insert a shape the same shape as your image, turn it white, and size it to the size of your image. Use arrange to send it to the back. Select all the layers and flatten.
Thank you for that but I am really sorry, I don’t understand. I have uploaded a decoupage sheet with about 5 roses in varying stages of decoupage. It’s when I click the select and erase key, the background goes purple checked but so do parts within the petal. If I save it, it appears on my canvas with the bits missing. Do I have to try and create the same shape as all the rose parts?
You don’t need to remove the background. If you remove the background, those areas will cut out. Upload the image again and don’t remove the background.
Here is my post about uploading JPEG files: https://lydiawatts.com/2021/02/27/cricut-design-space-basics-uploading-jpeg-files/.
Thank you for your help Lydia. I tried not removing the background and it just cut out a rectangle. In the end I imported the images into Lightroom and added a darker border around the areas that I didn’t want cut out and that seemed to do the trick.
Thank you so much for this tutorial.
I have never had any trouble with my print then cut but today was different. I wanted to use the curve program and so I downloaded pronto to do it and then uploaded my image to Cricut. So far everything looks great and then I added an ice cream cone to my circle. Now the image will not print. I flattened leach circle and still no luck. I also recalibrated the print then cut program on my Cricut and it worked fine. Why is my image not printed? Is it because of the ice cream cone I added?
You need to flatten all the layers of your design at the same time. Make sure you are making any duplicates by increasing the project copies in the project copies box on the Prepare screen rather than making duplicates on the design screen. Here is my post that shows how to do that: https://lydiawatts.com/2018/10/05/increasing-project-copies-in-cricut-design-space/ .
Thank you for this! It helped tremendously. But, I’m having a further problem I hope you can help with. I am making a tag with a laurel/floral border around it. Part of the leaves fall outside the area I wish to cut. In other words, I want to cut the circle tag, and have the some of the leaf edges cut off. I have flattened the images, but the machine cuts the circle AND the overhanging leaves. How do I get rid of them?
You will need to slice off the areas you don’t wish to cut.
This ie very helpful, thank you.
I am wondering if there’s a way you can make the background fit around your image snugly, if it’s not a typical shape?
Thanks
It sounds like you are wanting to do an offset. Here is more information: https://help.cricut.com/hc/en-us/articles/360061650414-How-to-use-the-Offset-feature-in-Design-Space-.
Super Helpful!!! Thank you!
I purchased a template for hand sanitizers and I cannot get it to cut just the template once I add text and images. I’ve grouped, attached and flattened. You’re saying to flatten all the layers st the same time? Should I not be using images and text on design space?
Hello, I wonder if you can help me! My first attempt at print then cut is going pear shaped and I can’t seem to resolve it. I’ve chosen an image (an owl) that has the printer icon from design space. It’s sized correctly but when I go to print it the mat breaks up the image into little pieces – I read your comments above so tried to flatten it but it doesn’t make any difference. I’ve tried different images but it is the same issue. I thought that the image within the black box would print exactly as is! feeling so frustrated that I can’t work it out!! x
What does it look like when you print it out?
Thank you, thank you, thank you!! I have wasted soooo much material trying to figure out why my stickers wouldn’t print correctly. Cricut was destroying them over and over. I looked all over YouTube and couldn’t find anything that worked. Then, I found you, and what do you know…I forgot to flatten them! This was my first time making stickers and I thought it would be my last, so thank you so much for your help!
You’re welcome! So glad you got it to work!
Hi Lydia, I am unable to post a photo of my problem. But I am cutting a Peppa Pig image on dark iron on transfer paper. The image is cutting perfectly which is great but there are two lines being cut also right down the centre of the image! I am perplexed can you offer any advice on this?
Also I was going to mention that when I did another test, I tried to put the image on a white background and then flatten it, it appeared without the error cut lines. But I was hoping to put the image onto the t-shirt without a background. (Transparent) do you have any tips, I am so confused at why I cant have an image without it needing to be put on a background…
Also so sorry! But I wanted to mention that the image I am using is totally solid, I was just hoping for my circuit maker to cut around the outline of this image.
Duplicate your image and change the duplicate to Basic Cut. Select both layers and then Align>Center. With both layers still selected, flatten.
Thankyou so much Lydia it worked!!
I downloaded a png file and when I try to do a print and cut my cricut cuts all the images inside of my letters. It also cuts up my letters really bad. How can I fix this and get it to cut correctly. Any help you can give I would appreciate it. I am using siser easy print htv for my project.
You don’t have a solid background. It’s hard to say exactly what to do without seeing the image. Normally, you would duplicate the image, hide all contours on the duplicated image, select both images, and flatten. I demonstrate how to do this in the post and video above. However, you may not be able to hide the contours on a PNG file. It sounds like your image may be poor quality. You may be better off finding a good quality SVG file instead.
Hi! Hoping you see this as it’s an old post. I am having trouble with print then cut adding a black border around the stickers I am trying to cut out. I have bleed turned off but it still adds a black line around the white outline (that I add in procreate).If I leave bleed on, I get a giant thicker black line. I don’t get the line if I use my iPad to print, but the colors are greatly diminished so I’d like to be able to use my laptop.
It’s hard to say what’s going on without seeing a picture. The bleed is there to ensure a clean cut with no white space. Most of the black line will be cut off.
Thank you so much for these instructions Lydia. I am sure you saved me hours of work attempting to accomplish this.
You’re welcome!
You are amazing!! Thank you I was doing all the things but I missed one little piece and it was screwing up my project!!
You’re welcome! Glad to help!
This info just saved me! Thanks so much for the helpful instructions!!
Lydia, you’ve saved the ears of countless vulnerable folks around me when I couldn’t figure this out!! I’m a seasoned Adobe Creative Suite user and this software boggles my mind – I’m prone to lots of cussing and spitting at an expensive piece of amazing technology! I feel like the apes in 2001, but no more. THANK YOU.